

Here’s the very detailed sew-along for the welt pocket of my dress Kilafors!
This pocket may seem daunting at first, but trust me, it’s not too complicated!
So, let’s go!
Here you see the parts you need to cut! On top are the two welt bands, both cut twice from the double fashion fabric, as you need 4 of each.
Below that you see my original pattern ( seen here without any seam allowance added)
And under that are the 2 thicker paper templates I use to get the sewing lines all perfect!
And finally the interface, I have not added any seam allowance here, as I don’t want that extra bulk inside the pocket bands. I recommend that you do the same unless your fabric is very thin or fraying a lot.

Our first step is to fuse the interface to the inside of the pocket bands! One pair of part A, and one pair of part B gets interface, the other pairs go without. (Interface on all 4 sides is possible but usually not necessary)
Here you can barely see it, as it’s so close in color to the fashion fabric, but if you take a close look you can see it, all inside of the sewing lines.
Remember, always use a presscloth, and don’t use steam! Apart from that, follow the instructions for your specific fusible interface.

While we’re at it, let’s interface the dress itself too! Around the pocket, fusible interface is used mainly to reinforce the fabric where it’s cut open to set the pocket in. This means that the interface must
1; be fused to the material before sewing and
2; be fused all over and around the the seams and the cuts.
So, my earlier advice to not let it reach into the seam allowances do not apply here, as it’s used for a different purpose this time. However, this doesn’t mean it need to go a long way into the seam allowance, I have cut it with only 0,5cm/ 5/8″ seam allowance, and none at all at the side seam.
As you see here, it doesn’t reach the edges of the pocket opening.
The outer edges I make rounded, this reduces the risk of them showing through. You can also cut them with pinking shears.
The bottom edge of this pocket is gathered, so there I have no interface at all, only the corner is reinforced.

With the interface in place it’s time to mark the sewing lines along the rounded edge . Use a template if you want. Mark only the pieces with interface on them.
The important part is to get a smooth and clear line, then the sewing will be easy-peasy!

Another advice is to mark the lower corner of all pieces with an A or a B, to know which one is which.
This will come in handy later, I promise!

Now pin two of the A parts together right side to right side. Important: Pin one with fusible interface, and one without!
Repeat with the two A parts left, and finally the two B pairs!
Now you have 4 welt pocket band pieces pinned right side to right side, time to sew all four along the rounded edge! Leave all other sides open.
After sewing you need to seriously trim the seam allowances. It should be no more than 5 mm, or 3/8 inch. Too much will give a bulky and uneven curve. In thick fabrics you may even need to cut out and remove ( notch) small triangles from the seam allowance, to make them lie flat. Use small sharp scissors,and be careful, no accidents please 🙂
It’s equally important to start with pressing this seam allowance properly apart. To do this you can for example lay down your sleeve board on the side, and use the side of the rounded top as a pressing surface. Or use a pressing ham if you have one!


After pressing apart, it’s time to turn and press the 4 pocket pieces from the outside!
If you’re not pleased with the rounded shape, try pressing apart again, or trim of some more of the seam allowance. From the outside, try using your thumb and forefinger and roll the seam between your fingers, to shape it. When you’re happy, pin and press neatly and leave for now.
Now sort your 4 pieces, one pair of A+B to the right side of the dress, and one set of A and B to the left. Put one pair to the side, and start with just one set!
The A part goes towards the center of dress, and the B to the side. The A overlap the B part, seen from the outside. Use the pattern/ your markings to see how much to overlap, or measure.
The finished length of the welt band will be:
Size 4: 19 cm / 7″ 4/8
Size 6: 19,5 cm / 7″ 3/4
Size 8: 20 cm / 7″ 7/8
Size 10: 20,4 cm / 8” 1/8
Size 12: 21cm / 8“ 2/8
Size 14: 22 cm / 8” 5/8
Important! Don’t include the seam allowances in this measure! This is the finished length!
Pin the two parts together along the lower edge, and start with topstitching the B part, or the one going under. Flip the upper one up, so you can keep on topstitching well beyond / under the overlap.

Now flip the overlap back, and topstitch the A part, all along the edge, catching the B part under the overlap too. Now your two-part welt band have become one!
To secure you can stitch them together along the bottom too, in the edge of the seam allowance.

Repeat with the other welt band, make sure you make it right, you want two mirrored, not identical ones!

This welt band is now going to be attached to the lower edge of the pocket opening, and this lower edge is also gathered!
But the first step is to mark the seams of the pocket, on the backside. the height of the band will be 4,5 cm/ 1 6/8″ , make sure your marking is correct. The two inner corners, towards the front of the dress, need to be marked clearly, they are the End-Of-Seam points you will use when inserting the pocket.

Start with sewing two gathering threads along the lower edge of the pocket, one on each side of the final sewing line. Don’t fasten the ends of this seam, and lower the threads tension on the machine.
For this seam you will find two markings on the pattern, as the gathers shouldn’t go all the way to the front of the pocket, or into the side seam, to reduce risk of wrinkles etc.
Now gently pull on he under threads to gather the fabric to it’s final length. This length is the same as the measures given above, for the pocket. This is the measure between the End-Of-Seam point and the side seam of the dress. No seam allowance, we’re talking finished length here!
Seen here is size 10, 20,4 cm. As you can see, seam allowance NOT included in the measure.

Always pull on both under threads at the same time.
If you put a pin in at the end of the gathering, see photo, you can wind the threads around it in a figure 8 to secure them, when you have the right length.


When you have this just right, it’s time to pin the pocket band right side to right side, along the pockets edge.
First double check the height of the pocket band, you want it to be exactly the same size as the opening you marked earlier. Mark an end of seam point, and use a ruler to mark a straight sewing line, ON THE BACKSIDE!

Make sure you have the A part towards the center of the dress, and the backside facing towards you, and pin the End-of seam points right on top of each other!
Pin and sew this seam , from the End-of seam point and all the way to the end of fabric.

The trick to get a good looking welt pocket is marking these End-Of-Seam points, plus end or begin the seam EXACTLY at them. You do this by moving the needle down BY HAND, right into that point, then you handwalk the machine ( use the handwheel, not your foot) a few stitches back and forth, until you have a secure fastening.
At the end of a seam, WALK the machine slowly. Before putting the needle down in the final place, you can push or pull a tiny bit on the fabric, to make the needle hit just the right spot. Fasten carefully. This is not difficult at all, just go slowly and maybe practice a few times…
So, now repeat that last step with the second pocket.
Now, for the inside of the pocket we need to attach the part called “inside” or “invisible”, on top of the seams we just made.
( For the photos I happened to sew the pockets in a different order, just ignore the pocket part seen near the top)
Here you see it to the right of the dress. Just lift it in and place it on top of the welt band, and pin it in place. It should be exactly the same length. Pin it in place and sew it from the other side. Here you can see the seam you just made, and you just sew it a second time, adding the new layer.

End in the exact same place, or maybe one stitch less! Back stitch properly here too.
The welt band will now be “sanwiched” between the “invisible pocket” and the “front of dress.”

It’s time to press this seam apart. It’s a pity to press prettily gathered fabric all flat, so I use the side of the sleeve board again, first to press all pieces apart, and later downwards, without pressing on the gathers at all.
Can you see how I keep them out of the way of the iron?

We are not finished at the inner corner, so leave it mostly unpressed for now.
Now it’s time to attach the other pocket part. It’s called visible, or backside pocket.
This one fits in the other side of the pocket-opening, from the upper End-Of-Seam point, to the side seam. Place it upside down on top of the dress front, with right side facing right side. Pin the end-of seam-points on top of each other, and sew this seam, and repeat on both sides of the dress.
Again, press this seam apart ( leave the inner corners) and later press the seam up!
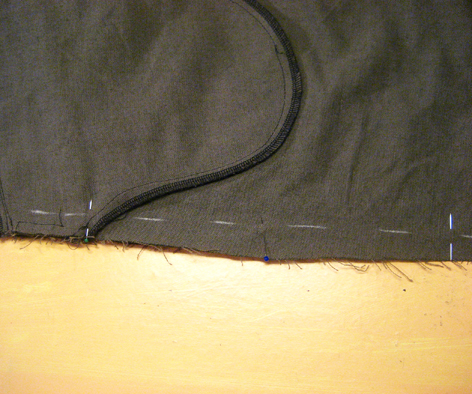
Now on the back side you have two parallel seams, from the side of the dress, to the end points. Now comes the scary part, to cut the fabric corners!
You have to use sharp scissors, as small as possible. And you must cut almost all the way to the last stitch!
Shown here on a darker fabric, to make it more visible:

Cut from the pocket opening, diagonally in, to both the End-of-Seam points.
If you cut too short, the fabric will not be able to lie flat, and your corner will be lumpy and uneven. In that case, turn back and try to cut a little more.
If you have an accident and cut too much, there will be a hole 😦 That can be covered with a patch, a bar tack or an arrowhead tack or any kind of pretty reinforcement! Don’t worry 🙂
Now it’s time to trim and grade the the two sides of the pocket opening. Grade means cut away the seam allowance in a gradual way, to avoid bulk. Learn more here:
All the time, handle the fabric extremely gently, don’t rip the corner cuts more open!
After trimming you should serge or zigzag along the two edges. The upper one will be visible, use a method you find pleasing, but don’t make it too thick, as this will show through!
Again, gently!
When you have two good cuts on both sides, it’s time to actually shape the welts!
Turn the fabric so that you see it from the right side. Very gently push the end of the welts through to the underside.

Push the welt band until it lies flat, and the opening you have cut is a straight vertical line, with the cut hidden on the underside, and no gaps or wrinkles, see below:

Pin through the band to keep it in place, place your hand like on the picture, and lift the fabric on the left side up and over your hand.
This is how it looks like when the fabric is lifted.

The edge of the two pocket parts needs to be sewn together to close the welt. Leave the rest of the pocket for now.
Sew a vertical seam between the two End-of-Seam points, try to form a straight line across the band of the pocket. Stop there and backstitch. Repeat on the other pocket.

Turn the dress over, and pin the outer side of the pocket opening together. Because of the extended shape, the side edges may not align perfectly, but try to pin it in place in a good looking way. No bumps or odd wrinkles along the side seam.
Sew or pin the welt band in the outer seam allowance to keep this in place. Leave the rest open for now.

Turn back to the inside again.

The pocket inside is still open, so with everything lying flat, start to pin the two parts together, going down from the ” across the welt” seam you just did. See above. Pin down to the bottom, to the mark at the tip of the pocket.
(Sometimes the pocket parts have moved or been misaligned. This is not a big problem, as you can see above! As long as it lies flat you can trim the seam allowance later. )
As the pocket is extended, one of the pocket parts is bigger, you see it clearly here:

So from the bottom of the pocket and along the outer side you pin them together “allowing” the bigger part to lie in a small fold or crease. The seam line around the pocket and the under pocket should be completely flat. Sew all around the pockets.
Finish the seam with a serger or your preferred method. Trim off the unevenness of the seam allowances.
Press the pocket flat around the edges, but leave the crease un-ironed!

Finally, when sewing the side seams together, it’s most likely that the extended pocket will form a pretty uneven line along the side.
Just lay the front of the dress flat, puff up the pockets in a pleasing way, and pin it all in place along the outer edge. On the backside, use a ruler to mark a straight seam line, and use it when sewing the front and backsides of the dress together. Remove the pins after that, and trim off the unevenness of the seam allowance.
After the side seam is done, looking good from the right side, trim off the uneven edge and finish the edges as you prefer.
Good luck with the rest of your dress!


Leave a comment